Introduction
This article explains how to setup HTTPS (SSL) server with ASW using Ubuntu server for HOOPS Visualize Web or Envision Web server.
Instructions
Create a Ubuntu EC2 instance
-
Create a Ubuntu Server 24.04 LTS EC2 instance with AWS
-
Configure HTTP (80) and HTTPS (443) ports in the inbound rule of the security group for a TCP connection


Create an Elastic IP address
-
Create an Elastic IP address
-
Associate the Elastic IP address to the Ubuntu EC2 instance

Ubuntu environment and nginx setup
-
Log into the virtual server using an SSH
-
Install and upgrade necessary packages.
Update available packages:
sudo apt-get update && sudo apt-get upgrade
sudo apt-get install linux-headers-generic linux-headers-virtual linux-image-virtual linux-virtual
Install required packages:
sudo apt-get install linux-source linux-image-extra-virtual build-essential xserver-xorg mesa-utils libglu1-mesa build-essential unzip xinit
Install kernel header package:
sudo apt-get install linux-headers-`uname -r`
- Install nginx
sudo apt-get install -y nginx
- Open the virtual server’s public IP address in your preferred web browser, and verify the default nginix Welcome page appears.

Get a domain
- Get a domain using a DNS resolver such as AWS Route 53, Freenom or etc.

DNS settings in Route 53
Create a hosted zone and associate an Elastic IP with a domain name.
-
Open
Hosed zonesof AWS Route 53 service
-
Input a domain name you’ve gotten and click the
Create hosted zonebutton -
Click the
Create recordbutton -
Register your Elastic IP address and click the
Create recordsbutton


Name server (NS) settings
Change the NS of the domain obtained with Freenom to the NS of the hosted zone created with Route53.
-
Open Freenom site and open My Domains from the Services menu
-
Click the
Manage Domainbutton
-
Select Nameservers from the Management Tools menu
-
Enter the NS record of the hosted zone created in Route53 in the form


Check DNS settings
Make sure your DNS is set correctly.
- Use the
digcommand to check if the domain and Elastic IP are associated
dig YOUR_DOMAIN_NAME

If the settings are correct, the value of the A record set in Route 53 will appear.
- Check NS records using the dig command
dig YOUR_DOMAIN_NAME NS @8.8.8.8

If the settings are correct, the values of the NS record set in Route 53 will appear.
Install certbot with nginx plugin
Install certbot which is a client for obtaining SSL/TLS certificates with Let’s Encrypt.
- Back to SSH of virtual server
- Install certbot with python3-certbot-nginx which is a plugin for nginx
sudo apt install certbot python3-certbot-nginx
python3-certbot-nginx is a plugin that supports nginx, and if you specify the -nginx option when running certbot, there is a function that automatically adds settings for nginx.
Obtaining an SSL/TLS Certificate
- Execute the certbot command to issue an SSL/TLS certificate
sudo certbot --nginx -d YOUR_DOMAIN_NAME -m YOUR_EMAIL_ADDRESS --agree-tos
Options specified when running certbot
--nginx
Use a plugin for nginx. By using this plugin, in addition to issuing a certificate, it also add settings for https communication to the nginx configuration file.-d domain_name
Specify the domain name for requesting certificate issuance in FQDN format.-m email_address
Specify a recipient email address for notifications from Let’s Encrypt.--agree-tos
Agree to the terms of use: Policy and Legal Repository - Let's Encrypt
nginx server settings
- Show server setting file of nginx
cat /etc/nginx/sites-enabled/default
-
You can verify that the server settings for SSL are automatically configured by python3-certbot-nginx plug-in
-
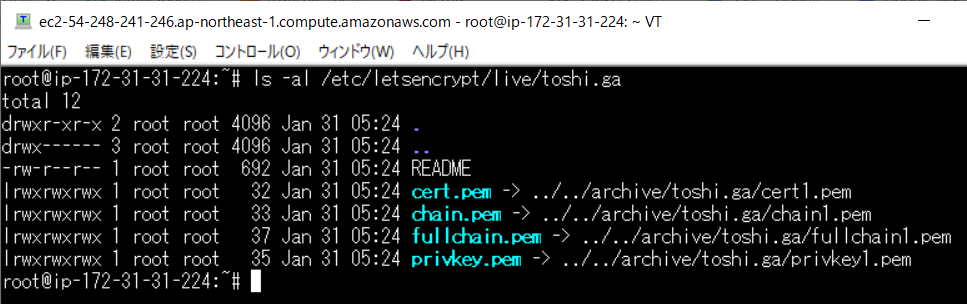
Login to root user

sudo su -
- Verify SSL certificate files were issued using certboat
ls -al /etc/letsencrypt/live/YOUR_DOMAIN_NAME
- Now you can access to the web server using HTTPS protocol
